Pages

Tuesday, October 11, 2011

Die Cuttin Divas Challenge!

It's time for another Die Cuttin Divas weekly challenge!  This week is all about desserts.  We would like to see a dessert somewhere on your project.  I decided to branch out from cards and layouts and came across an incredibly cute idea for a cupcake gift card holder!  Check it out!!


I had so much fun making this!  I used THIS tutorial called 'Hey Cupcake' from Fabulously Artsy and just did my own thing in places.  The tutorial is wonderful but I did make some changes.  Below is a general run down of what I did!
1.  Cut out 6" circle on chipboard.  Then trace a 2" circle.  Cut the edges just up to the inside circle and fold up to make a cupcake.  Hot glue it together.
2.  Accordion pleat paper to cover outside of cupcake.
3.  Cut a 3" Styrofoam ball in half, position gift card inside, use foam dots along sides to hold it together.  Then glue it inside the cupcake.
4.  Glue ribbon and paper flowers (I used Forever young cart) to cupcake to decorate making sure you don't cover the opening.
5.  Paint wooden bead red, and glue it to the top of a small binder clip.  Use crumbled paper or ribbon to make 'whipped cream'.
6.  Insert gift card into binder clip, slide it into the cupcake and finish with glitter and stickles!


 I used glossy accents on the bottom layer of paper flowers and sprinkled them with Martha Stewart glitter.  I loaded the top layer of flowers with Studio G glitter glue.

I think it turned out pretty cute for my first go!  I can see myself making a whole lot more of these!  I think they are adorable!

Be sure to submit your dessert project HERE at Die Cuttin Divas for a chance to win our weekly prize!!!

Thursday, October 6, 2011

Paper Primper Halloween Blog Hop

Today is the last day of our Haunted Halloween hop. We hope you have had fun hopping from one Design Team blog to another, enjoying many fantastic cards, pages, and tags, and assorted projects. Today we reveal additional project so be sure to hop along!!  If you have had fun, then come join us November 1-4 as we showcase Christmas projects. Paper Primper is the sponsor of this hop. So, let’s get started. Paper Primper is the start of the hop. Follow along with us to:


You should be arriving at the blog hop from Kacee. If you came here by chance, go to Paper Primper to start. If you are ready to go to the next site, go HERE and check out what Suzanne has created!

For my project I stumbled across Linda's Stamping Loft and she had this SUPER cute idea that I had to try out.  You can find her post HERE.  I decided not to put too many embellishments on the front of mine so I could really show off the Paper Primper papers!  I think they turned out adorable! 


Have any of you ever been 'BOO'd'?  When an annyonomous person leaves a basket of goodies on your front step?  I'm preparing myself to get 'Boo'd' this year.  I'm NEVER prepared!  So I thought these little treat holders would be perfect.  I'm not as prepared as I'd like though as I do not have any snack sized M&M bags around.

See you next month!

Wednesday, October 5, 2011

Haunted Halloween Blog Hop!

Hello friends! Today marks day 3 of the Paper Primper Altered Art Haunted Halloween Blog Hop.  Be prepared to see some wonderful designs. Be sure to stop by all of the blogs to get some great inspiration!

Here is the lineup for today's hop.
Kacee http://youhadmeatscrap.blogspot.com
Jessica http://paperdeckerations.blogspot.com (YOU ARE HERE)
Suzanne http://suzannerosberryartfortheheart.com/blog.html

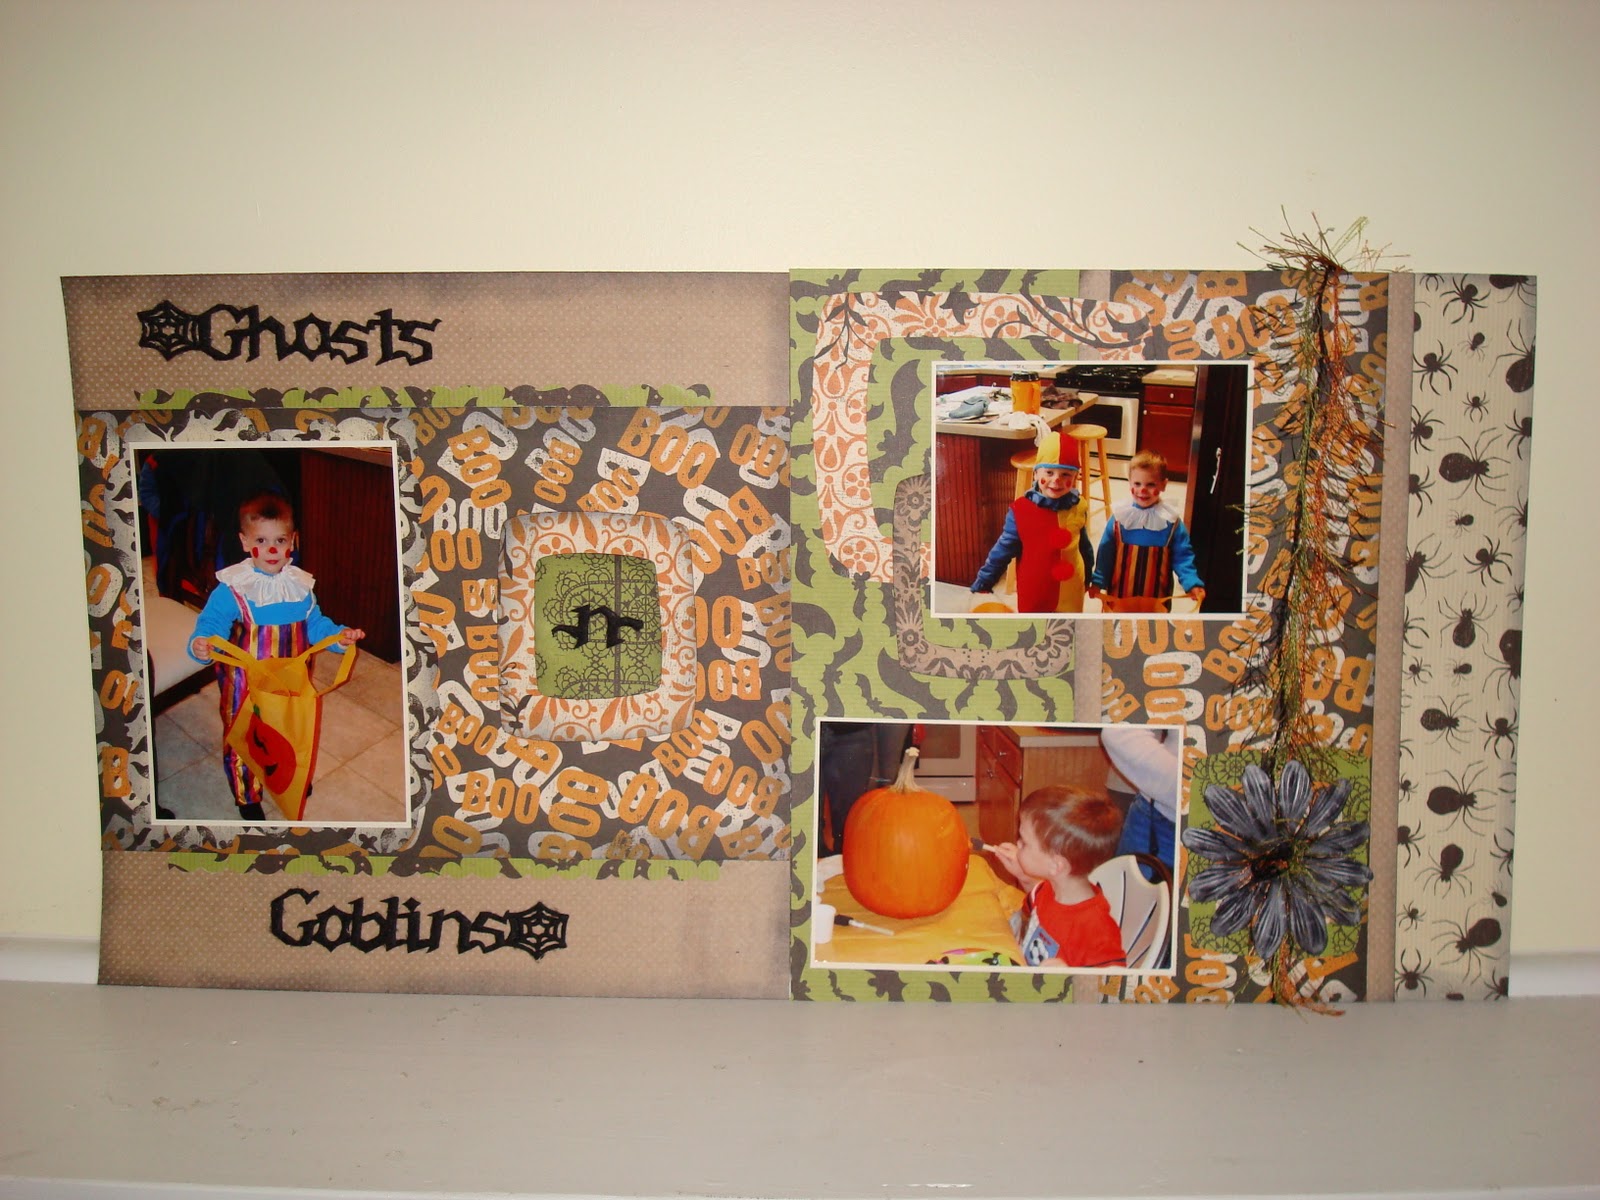
I decided to make a double layout for my project.  The papers were so easy to work with and I just love the color combination.


All of the paper is from Paper Primper Altered Art as well as the black, green and orange fibers.
I used Home Accents for the large 5x7 frame and Gypsy Wanderings for the smaller hollow frames.
The flower is from Imaginisce and I inked it to make it darker (it was originally white).
The Ghosts -n- Goblins stickers are from Queen & Co.
I used black ink from Rubber Stampede to ink the edges of all of the papers.
The scallop edge is from ek success victorian scallop diamond.

I hope you are able to get through all of the wonderful projects and get some great Halloween inspiration!!!

Day 1:
Paper Primper Altered Art: http://paperprimper.blogspot.com/
Kassi http://kassicreations.blogspot.com
Tammy http://tammysmakingmemories.blogspot.com
Audrey http://www.paperartbyaudrey.com

Day 2:
Diana http://dianamlarson.blogspot.com
Patty http://creativediva98.blogspot.com
Giselle http://yuveriaseden.blogspot.com
Yvette http://cre8tivegirls.blogspot.com

Tuesday, October 4, 2011

Die Cuttin Divas October Sketch Challenge

Welcome to another sketch challenge over at Die Cuttin Divas! I had so much fun working with this sketch.  I usually change them up a bit to really make it my own project.  I knew exactly what I wanted to make and it came together perfectly!  Here is the sketch:
and here is my take on it:

I decided to think about my almost 7 year olds birthday.  He is really into 'army' and camouflage so I thought this was right up his ally!   I used George and Basics for the stars.  Just cut regular rectangles for the background papers and used Christmas for the 'banner'.  I actually just enlarged the ribbon cut on the Christmas cartridge and used 1 of the tails of it!  Worked perfectly!  I also embossed the camo paper with D'vine Swirls.  I inked the edges and finished it off with some doodling.  I think he is going to love it!

We'd love to see how you interpret the provided sketch!  Submit your cards HERE for a chance to win a great prize!!!

Tuesday, September 13, 2011

Die Cuttin Divas Challenge

Well the kids are back in school and my first day of kid 'freedom' and I'm home with a sick one!  Hoping tomorrow he feels better.

Today at Die Cuttin Divas we want to see animals on your cards and how about some bonus points for making a shaped card!  These are still really hard for me since I only have the personal cutter.  I have to really look at the dimensions of the image and make sure I can fit it on a 6x12 mat!  Well I found this dog and fell in love!  I don't even know what I'm going to use it for but I think she came out adorable!!  Take a look!

The dog was cut from Create a Critter but I hid his eyes and mouth using my gypsy.  Whenever I can add Peachy Keen Stamps to a project I take full advantage!  and even though I don't have an animal assortment I think the Everyday Character Face Assortment that I used turned out just fine!  I used glossy accents on her nose and ears and added some jewels from my stash to her collar.  I decided to leave the sentiment off and add it on the inside later on when I figure out who it's going to!!

We'd LOVE to see your animal projects this week over at Die Cuttin Divas!  Be sure to submit your project HERE for a chance to win our weekly prize!!

Tuesday, September 6, 2011

Die Cuttin Divas September Sketch Challenge

Another Tuesday morning.....except it's the first day of school for my big boys!  They are so excited!  We had a great summer but we are all ready to have some sort of routine again!

Since it's the first Tuesday of the month it's our sketch challenge over at Die Cuttin Divas.  I had a lot of fun playing around with this sketch!  It incorporated everything I love putting on cards!  Take a look!


I finally added some new cartridges to my collection!  I used Home Accents for the die cut.  The stamp is from All Night Media and I coated the top layer with Glossy Accents. It made the stamp really stick out!  The ribbon is from Celebrate It and I used the Scallop Diamond border punch from ek success.  I embossed the entire background layer of the card with D'vine Swirl.  I've never done that before and I think it turned out pretty neat!

Hopefully you can find some extra free time this week to play around with our sketch.  Be sure to submit your card HERE for a chance to win our weekly prize!

Tuesday, August 30, 2011

Die Cuttin Divas Challenge!

Good Tuesday morning!  I cannot believe how busy our summer has been!  The kids did give me a little time this week to work on a layout for the Die Cuttin Divas weekly challenge!  This week we want you to make a project using fall colors!  Although in some places it is still summer in full force, I do believe fall will be here before we know it!  I dug out an old picture that I've been meaning to make a layout for and here is what I came up with!


Here is what I used:
Stretch Your Imagination cart - tree
Gypsy Wanderings - FRIENDS cut
Designer's Calendar - leaves
K&Company - giggles and fun chipboard pieces
Eyelet Outlet - squirrel and acorn brads

I can't wait to see what you create using fall colors! Be sure to submit your projects HERE this week!!

Tuesday, August 16, 2011

Die Cuttin Divas Challenge!

Another Tuesday Challenge!  I cannot believe that summer is almost over and the kiddos go back to school in 3 weeks!  I know some kids are already in school!  This week over at Die Cuttin Divas we want to see KIDS on your projects.  Here is what I came up with!


I just recently had a close friend and neighbor move across the country and that is what inspired me to make this card.  I think it turned out adorable!

I used Paper Doll Dress up for the kids and Blackletter for the banner that they are holding.  The flower brad is from Eyelet Outlet.  I chose Peachy Keen Stamps Everyday Character faces.  I just love adding their faces!  The sentiment is 2 different stamps from Recollections.  Inked the edges and added some doodling!  It was a very simple card to make!  We'd love to see what you create this week over at Die Cuttin Divas!  Link up your KIDS project HERE!!

Tuesday, August 9, 2011

Die Cuttin Divas Challenge!

Good morning!  It's Tuesday again which means another challenge over at Die Cuttin Divas!  This week was inspired by our gardens!  So we would like to see fruits and veggies on your projects.  My garden is out of control!  Seriously out of control!  I have 11 yellow squash sitting on my counter right now and 6 more ready to be picked.  I have 10 tomato plants (GORGEOUS tomato plants) and none of them have ripened yet!  I am getting impatient...I love tomatoes!

Anyway, I could not think of  a cute card to make with any of the veggies that are completely overgrown in my garden so I came up with card to make for my friend's anniversary tomorrow.  Take a peak :)

I think it came out pretty cute!  It's a standard size card.  I used preserves for the pears, tried making one look 'masculine' and one 'feminine'.  I welded 'what' together using my gypsy and used Lyrical Letters cart.  The word pear came from Just Because Cards.  I loaded the words up with glossy accents to make them stick out a bit.  I added the pearl brad from Eyelet Outlet and used a bronze pearl pen for the corner accents.  Finished it off with some doodling and there you have it!  It was a pretty simple card!  I think it's totally cute and fits my friend's personality perfectly!

Be sure to link up your project for a chance to win a great prize!  Submit your card or layout HERE!

Tuesday, August 2, 2011

Die Cuttin Divas Tuesday Sketch Challenge!

WOW did I ever underestimate how much time I'd actually have during the summer to do my crafting! I cannot believe I am only able to really accomplish 1 project a week! I do however find myself really putting forth more effort in what I am able to put together. Like this card for instance. I am so incredibly happy with how it turned out!

This week is the weekly sketch challenge over at Die Cuttin Divas. I was so excited to work with this sketch because it's so gorgeous!

Here is the way I interpreted it!


I am so thrilled with how this card turned out! The sunflower is from Stretch Your Imagination. I embossed the middle with Swiss Dots, coated the pedals and stem with glossy accents and used Studio G glitter glue on the leaves. The background paper is all inked and I used D'vine Swirl embossing folder on the right side. The sentiment is from Peachy Keen Stamps (PK-288 Skunk Cheer Up Set), stamped with Technique Tuesday Chalk Ink Pads and the frame is from Gypsy Wanderings. I added some lady bug brads from the Eyelet Outlet and some adhesive pearls from Oriental Trading Company. The ribbon is from Tim Holtz Idea-ology Lavish Trimmings and I inked it with his coordinating crushed olive distress ink. I machine stitched the edges for the final touches! Also the frame and sunflower are popped from the card with ek success 3D dots.

Thanks so much for stopping by. We'd love to see what you create from the provided sketch! Be sure to enter your project HERE for a chance to win this weeks great prize!!