Pages

Tuesday, May 31, 2011

My itsy bitsy Spiderman!

Hello and welcome to Die Cuttin Divas Creepy Crawly Challenge #17. I had an absolute blast putting together this layout! It really brought me back to when my kids were teeny tiny. This was back in February 2008. My little guy insisted on wearing a Spiderman costume and running circles around my living room. It's not in this layout but my then 3 year old was doing the same thing. How could I resist snapping tons of action pictures!


I just love how this turned out! I kept finding fun things to add on to it...without overdoing it. And then when I found the 'Itsy Bitsy' sentiment I just fell in love! I pulled out my sewing machine again! It's not perfect but I think it adds a neat perspective to the layout! I also added glossy accents to the black spider to make him shine and stand out a bit! I inked the edges of the paper, spider web, and sentiment. The thread is just from my stash.

Mini Monsters cart - sentiment, webs
Indie Art cart - spiders
Rubber Stampede - ink

Sunday, May 29, 2011

Fun layout

Recently I found Sassy Lil' Sketches, a great challenge site for layout and card sketches! I decided to combine their May 21st Sketch Challenge with the More Than Favors Wacky Wednesday #39 Color Challenge - to use the colors brown, teal, pink and cream.

I had been trying to knock out these layouts and while looking through my paper stash I came across this beautiful sheet that I just couldn't pass up. and combining it with the other required colors...oh my gosh it was so fun to work with! So this layout is way back from an Easter trip to Georgia we took with my family. There isn't too much to do in Georgia but we took advantage of the beautiful weather and spent the day at a local park! The boys of course couldn't resist finding worms. BOYS!

Below is the layout sketch from Sassy Lil' Sketches


I decided to turn the sketch.....and here is what I came up with.


It's really a simple little layout...and cricut-less! I love being able to use the object on the paper and just working around that. and I really like that although it has a fair amount of pink involved it still screams all boy!

The Girls' Paperie (paper girl) - sentiment frame and flower die cuts
Phrase Cafe - 100% Boy sticker
ek success Victorian Photo Corner
Recollections border punch
Studio G ink - inked edges of cream paper

Peachy Keen Sketch Challenge #52

What a crazy busy weekend! I'm glad I was able to find time tonight to put together a card for one of my favorite challenges....Peachy Keen Stamps! Below is the sketch for their sketch challenge #52.
And here is what I came up with.


I'm really loving making these baby cards. I'm getting better at really digging through my current cartridges too. I can't believe I found this little doll on the Christmas cartridge! I'm proud of myself for even opening that cartridge in.....May! I think she's adorable! I inked all of the edges, added some ribbon and the 'it's a girl' sticker from my stash.

Christmas cart - doll
Gypsy Wanderings cart - bottle
Oriental Trading Company - pearls
Peachy Keen Stamps Everyday Character Faces
Rubber Stampede, Tuesday Technique - inks

Tuesday, May 24, 2011

Flowered with thanks!

I've been meaning to make a shaped card for some time now but I feel limited with my personal cutter. I may have to upgrade to an expression soon! I had to find an image that was basically square so I could enlarge it to 6x6 and virtually make a 5-6" card. So what better than a flower! and my go to cartridge is always Forever Young! I made this card for the Whimsical Wednesday Take Shape Challenge and the My Craft Spot Monday Challenge #9, both requiring a shaped card. Here's the final product :)

I just love embellishing flower cards, well flower anything really! After I assembled the flower layers I was actually kind of stuck as to what to spice it up with. I used glossy accents and Martha Stewart Course glitter for the center layer and then pulled out my pearls. I decided early on I was making this card for my 1st grader's teacher since the end of school is right around the corner. I cut my own little tag and stamped it. I also inked all of the edges. I really don't think the picture does it justice. I always find my stuff looks better 'in person'!

Forever Young cart - Flower and all layers
Oriental Trading Company - small self adhesive pearls
Eyelet Outlet - center pearl brad
Studio G ink to ink edges

Die Cuttin Divas Challenge #16

This week at Die Cuttin Divas we were to make a project for celebration, using party hats, gifts, etc. I couldn't resist doing another birthday layout...for yep the same kid but now his second birthday! We had a theme this time...ELMO! and as a warning to all of you, I've boycotted red frosting since! I really had a blast making this LO and I think it turned out ADORABLE! I just LOVE this Sesame Street Friends cartridge. Thanks mom for giving it to me!


I'm completely in love with the Elmo's! I cut them pretty big (5") mostly to help with the details of his fur.


I've been trying really really hard not to overwhelm a page with 6 pictures that I ABSOLUTELY have to have displayed. I've been good about picking my top 1 or 2 and embellishing the page with other cute details. I have photo storage boxes for each of the boys for their extra pictures and that helps a lot! Below is the recipe for the page. Can't wait to see what you come up with! Come play along with us HERE!

Sesame Street Friends cart - Elmo
Sweet Treats - part hats
Sweethearts - gifts
George and Basic Shapes - the number 2
ek success victorian photo corner punch
ek success scallop diamond edge punch
Tuesday Technique blue chalk ink
Rubber Stampede black ink
Stampin Up - celebrate
Stickles - top of party hat

Monday, May 23, 2011

Baby Boy

I'm slowly checking off various cards I need to make for events I have coming up this summer. I have a friend due with her first boy next month so I thought I'd make a baby boy card and check off a few challenges at the same time!

Over at Whimsical Wednesday the challenge is Back to Basics....to make a project NOT using the cricut and to use old school embellishments (stickers, rub ons, etc.). Also at Tuesday Throwdown the challenge is to make a baby/child project.

I was able to put together a quick card last night! Here's what I came up with!


I'm so proud of myself! I whipped out the sewing machine last night and tried it out for the first time. NOT BAD!!! I think I sew paper better than fabric! I have a feeling I'll be using it a lot more often!

Well as you can see there are no cricut cuts. I just found some cute boyish paper, added some bakers twine and a button. The stickers are from Creative Imaginations.

Sunday, May 22, 2011

An awesome giveaway!

I wanted to share with you all that Julie K from A little bit of Bling is having an amazing giveaway! The layout she submitted for the Let's Get Campy challenge over at Getting Cricky with K Andrew WON! She ended up winning the Campin Critters cartridge but already has it....so how awesome is this...she is re-gifting it to 1 lucky winner! Be sure to head over to her blog HERE for the full details!

Friday, May 20, 2011

It's all about the shoes!

I have a bestie friend whose birthday is next week and each year we go to DSW shoe shopping with all of her birthday coupons. She is a shoe fanatic! She is a heals fanatic! She'd wear heals to work out if it were....well not so frowned upon. She came home a few months ago from the store with this gorgeous pair of animal print heals and I thought they were adorable! It gave me the perfect idea for a birthday card :) and I'm really happy with how it turned out!!! It's just really simple, but so HER!


I used Forever Young cart for the shoes and Recollections Animal Kingdom paper pack. The bling on the shoes is actually from Oriental Trading Company. I also added some glossy accents to the sole and heals :) The purple paper was cut with my Fiskars border punch, stamped with an Inkadinkado stamp I got out of the Michaels dollar bin, using Studio G ink. I added some bakers twine and a button for a little more decoration. I also inked the edges of the card itself.

I'm able to enter this card into the Paper Playtime Challenge #45 which was to create a tall card and Birthday Sundaes Challenge #9 which was to create a birthday card and add at least 3 circles (hopefully my bling counts!). I'm also entering it in the Paper Sundaes Challenge #69 Happy Birthday Christine which is to make a birthday creation!

Lastly I added it to the Patches of Pink Thursday Link Up Party!

Patches of Pink

Tuesday, May 17, 2011

Link Up Love Party with K Andrew

Hi everyone! I have decided to participate in the Link Up Love Party with K Andrew. This is a great way to get to know other crafty bloggers and get lots of creative inspiration! Check out K Andrew's blog HERE.

I wanted to share my most favorite project.

It's just a real simple card but it's one of my very favorites! I used Forever Young cart and welded a few shapes to the models dress layer to make her look pregnant. Just added some buttons, ribbon and bakers twine to decorate it up a bit.

I hope you decide to play along!!


A very late 1st birthday

I have some catching up to do....clearly! I'm just now doing a 1st birthday page for my 4.5 year old. Someone reassure me that some day I won't be 3 years behind!

I really enjoy doing layouts lately though, probably because I can get that much closer to filling the boys' albums! I decided to do this layout page because his 1st birthday was pretty generic (poor 3rd child). I didn't have a theme or do fancy invitations, so as you can see in the picture it was all about presents and cake! I wanted to use cuts that I could emboss as per the Whimsical Wednesday Happy Birthday Challenge. I am also entering it into the Paper Sundaes Challenge #69 Happy Birthday Christine!


I had a lot of fun with this layout! I would have normally only used 1 balloon (since he is only 1) but I thought that looked funny! I also stuffed some tissue paper behind the gift bag to make it look like a real gift :)

Sweethearts Cart - presents
George and Basic Shapes Cart - Sentiment
Create a Critter Cart - gift bag
Stretch Your Imagination Cart - balloons
Sweet Treats Cart - cake, candle
Swiss dots Cuttlebug folder - balloons, cake
D'vine Swirl Cuttlebug folder - cake
Candy Cane Stripe Cuttlebug folder - sentiment
Studio G Glitter Glue - candle flame

Sunday, May 15, 2011

Die Cuttin Divas Challenge

I am bursting with excitement! This is my first challenge as part of a design team! Yep, I am officially on the Die Cuttin Divas Design Team and I am so honored! I jumped right at the chance to make a card for this weeks Masculine Cut Challenge #14. We were to use a masculine cut on our project. I immediately came up with a birthday card for my almost 8 year old. He started Tae Kwon Do last month and is really loving it. He was never a 'team sport' kinda kid so I was THRILLED when he first of all suggested trying it own his own, and second of all wants to stick with it! He's improved by leaps and bounds over the past month and it's really boosted his self confidence. So in honor of his new found passion I made him this birthday card :) (t-minus 15 days until I officially have an 8 year old!)

I wanted to really use bold, deep colors and I think it turned out super perfect! To get a more dramatic look I inked the edges of the background paper. I'll admit I'm not crazy about the Korean Flag but, in my defense that thing was tough! I punched a circle from my Creative Memories Circle Punch and used the layer feature on Sports Mania cart. The person is also from Sports Mania. My birthday boy isn't quite a yellow belt yet as he just started but I thought this might give him a boost to practice more! His belt test is in a few weeks! I'm thoroughly impressed I actually tied it correctly too! The 'Birthday Boy' sentiment was cut from Lyrical Letters. Now hopefully I can hide it for the next 2 weeks so he doesn't see it!

Baby girl

You will never hear me complain about making baby girl cards! I have probably 4 friends right now who are expecting babies in the next few months. 1 of them knows it's a girl and the others are going to be surprised. So I took this opportunity to make a special baby girl card. This is actually going to be her third girl so I joke that I have the other half of her Brady Bunch!

I'm entering this card into a few challenges, the first being the Peachy Keen Stamps Sketch Challenge #51 with a twist. The twist was to pop up a stamped image on the card. I'm also entering it into the Cricut Cardz Challenge #74 which is to make a card for a new baby (PERFECT!!). My card also qualified for the More Than Favors Wacky Wednesday #38 Anything Goes Challenge. Finally I'm including it in the Patches of Pink Link Up Party!

Patches of Pink

Here is the Peachy Keen sketch I was to go by:

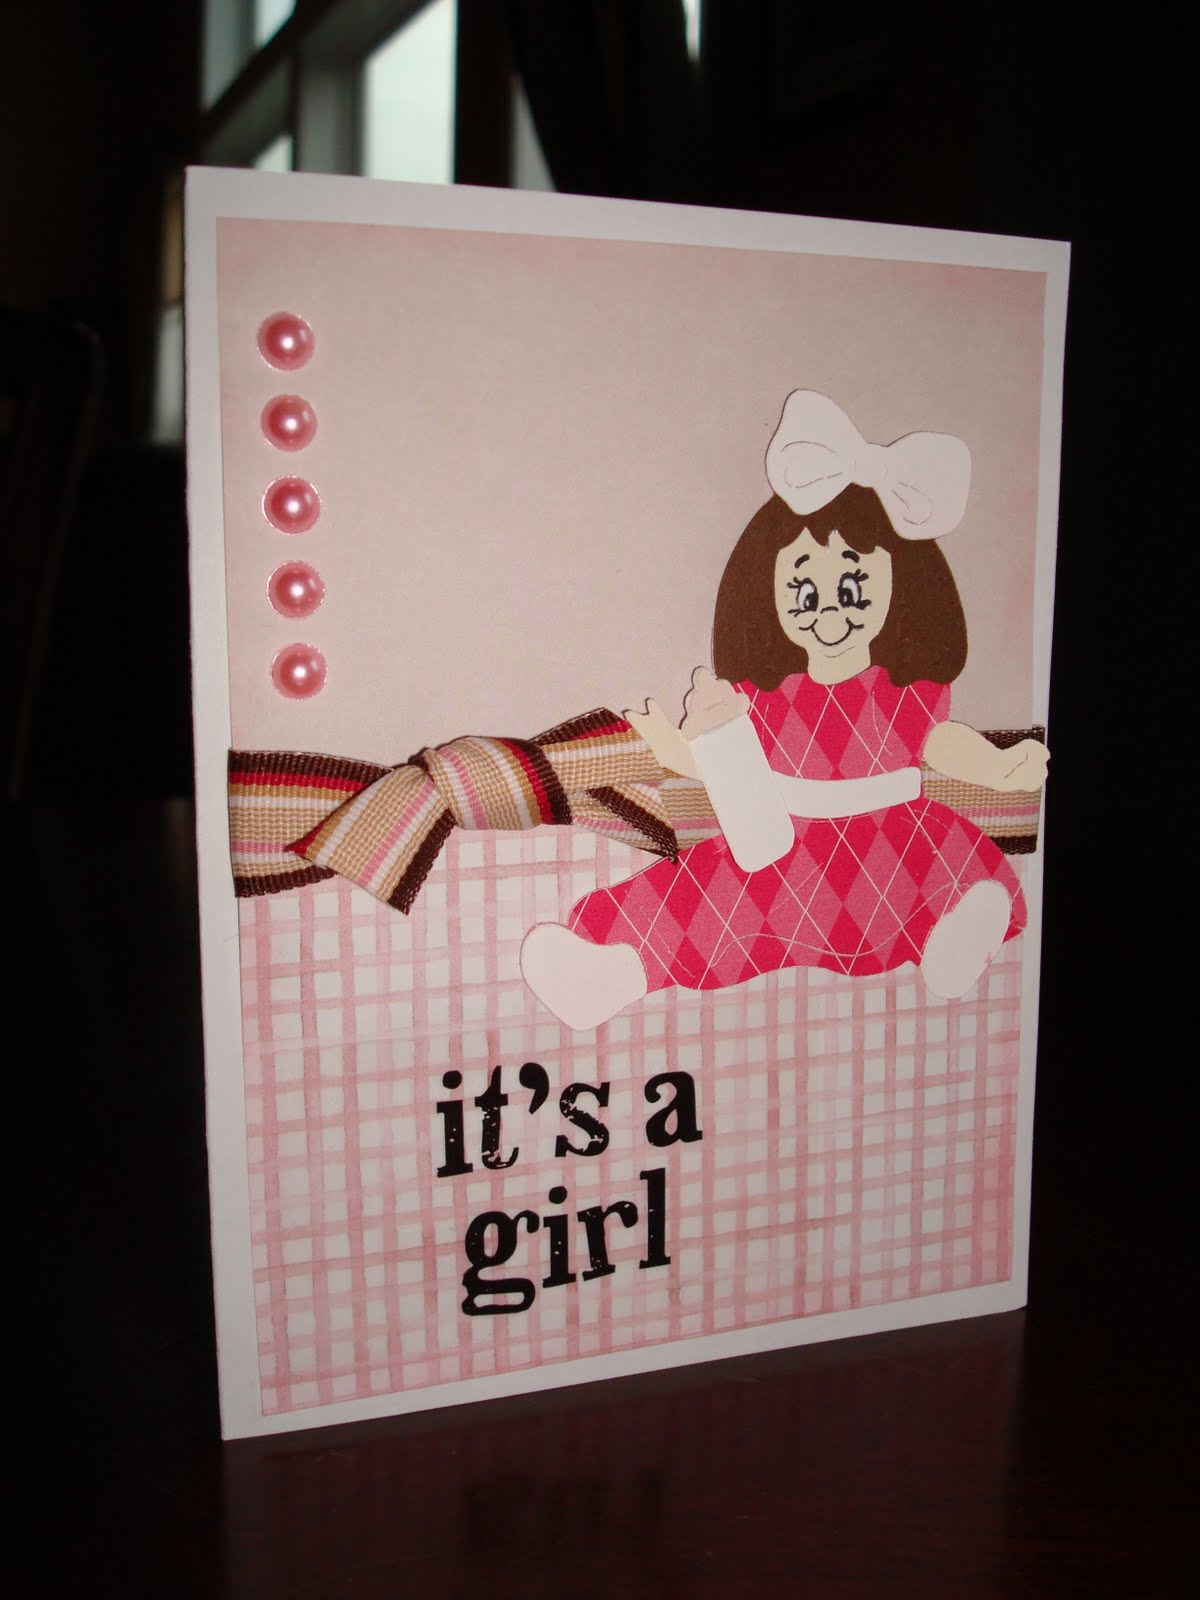
And here is the card I made!

I'm really happy with how it turned out! I love the colors, I love the glitter! I love how girly it is! and it was really simple!


I started by stamping the background of the card. I felt like there was too much empty space behind the frame. I cut the frame from Stretch Your imagination, inked the edges, outlined it with glossy accents and used my Martha Stewart coarse glitter to glitz it up a bit! I also outlined the edges of the baby blocks with glossy accents and added glitter to those. Can you really have too much glitter?! Popped the blocks from the card per the twist in the Peachy Keen Challenge (as shown in the second picture) and added a ribbon to finish it up! I still can't believe how pretty this card turned out!

Background Frame - Stretch Your Imagination
Baby Letters - George and Basic Shapes
Inks - Studio G, Technique Tuesday
Stamps - Rubber Stampede, Scrappy Cat
Ribbon - Celebrate It
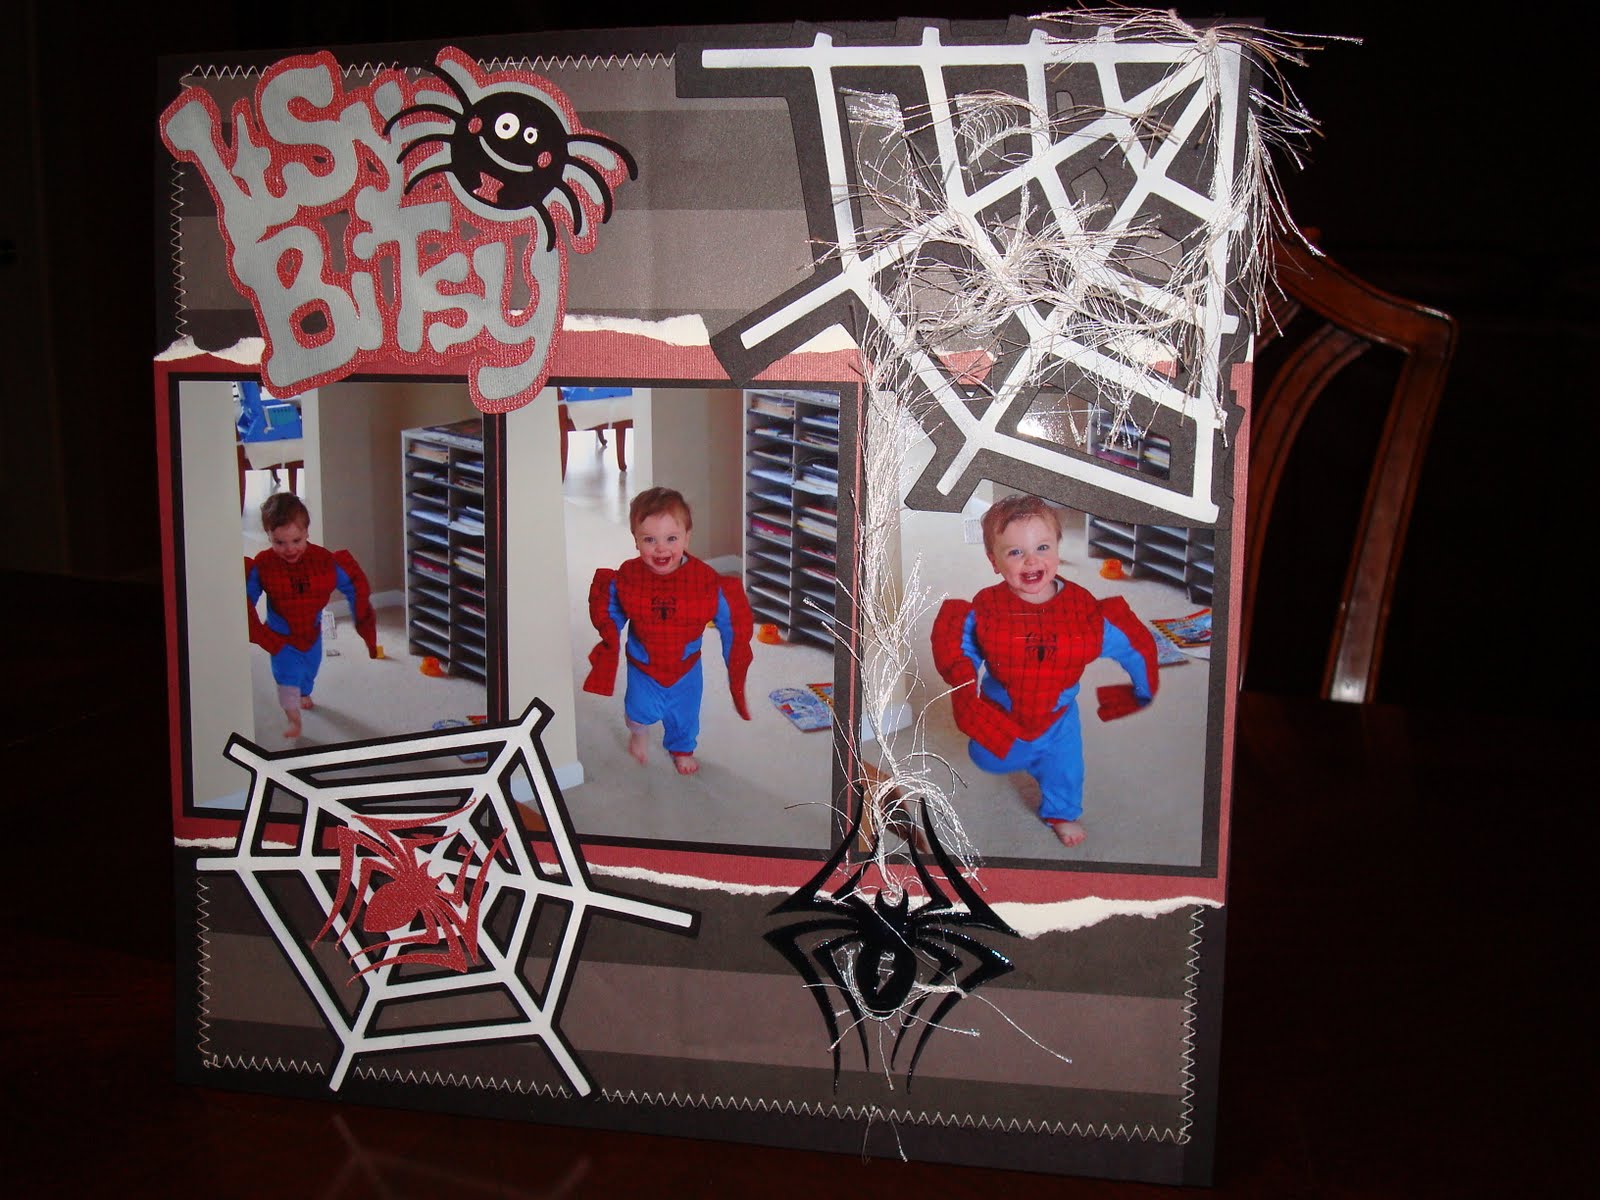
Tuesday, May 10, 2011

Die Cuttin Divas Sketch Challenge

I had time to do a quick card tonight for the Die Cuttin Divas Sketch Challenge. Below is the sketch we were to go by.
and here is what I chose to do.


I just love the subtle colors! I'm so used to using bright patters that this was quite a change for me! I really like how it turned out! I used Sweethearts Cartridge for the swirls. The border punch is from ek success.

Tuesday, May 3, 2011

Let's go camping!

I've been itching to work on some of my layouts and when I saw K Andrew's Getting Cricky Simply Sunday Challenge Let's Get Campy it gave me the perfect opportunity. This was the first year we had gone camping as a family. Our rule was that you had to be potty trained so we were waiting on the little guy! We did a trial run for one night at a neat little rustic place just in town. The kids got to fish, swim, collect fire wood, make smores, and the best part....sleep in a tent! It was so much fun we are making it a huge extended family yearly outing! Here's the layout I made for one of the boys' books.

I just love capturing these candid moments! All the kids got to fish and my other 2 caught their fish immediately. Then poor Lance. The fish kept tugging the line, eating the worm and swimming away! It took him hours to catch one! But he finally did and he was so proud!

The clouds, moon, fire and fish are all from Create a Critter. The title is from George and Basic Shapes so I could have a layered look. The tree is from My Community. The stars are punched from my Creative Memories Star Punch. The dirty stinky boys sticker is from Making Memories leather adhesives. Then I cut out a scallop border from Plantin Schoolbook. The Happy Campers title is just cut from a piece of camping paper. I plan to journal in the void right next to the group shot in front of the tent. Ok 1 down, 2 more to go!